Operations
Overview
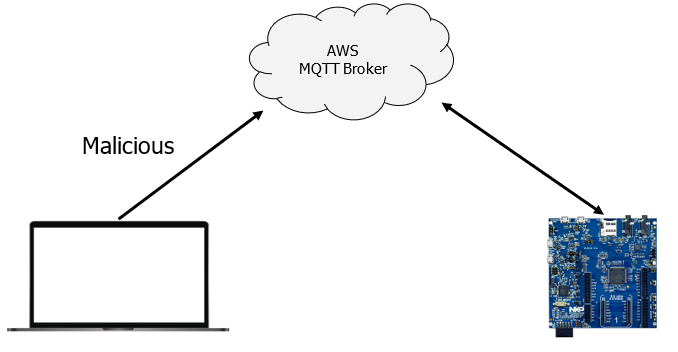
The target device connects to a MQTT broker provided by Amazon AWS and subscribes to different MQTT topics. Each topic represents a vulnerability that can be exploited.
The exploitation of the vulnerabilities, which are described in the previous section, is performed by sending specific MQTT commands to the board’s firmware using a python script (aka. the exploitation script). It will transmit a command with a specific payload that will exploit the device.
Configuration
Connect to the Board's Serial Port
Identify the COM port assigned to the board:
- On Windows, go to Device Manager > Ports(COM & LPT)
- Search for the COM port number right next to LPC-linkII UCom Port (e.g. COM3)
- If the device is not listed:
- Make sure to use a good quality USB cable. Try with a different cable.
- Make sure to connect directly the USB cable to the PC instead of via a USB hub.
- Reboot your PC.
Start the terminal software (e.g. PuTTY) with the COM number assigned to the board and set the Baud Rate to 115200.
Connecting the Board to the Wi-Fi Network
Connecting the board to your local Wi-Fi network is needed for triggering attacks against the board and for the board to send alerts and traces to the Sternum Platform.
The local Wi-Fi network shall provide internet access to allow the firmware protected by Sternum on the board to send alerts and traces to the Sternum Platform. We recommend using a hotspot to avoid IT connectivity blockage.
Make sure you are connected to the serial debug port using the terminal software and you can see the log messages
Reset the board by pressing the Reset button
The serial debug should show error messages related to the Wi-Fi module not configured (Wi-Fi module is not configured for WLAN connection.) or the Wi-Fi module failing to connect, for example:
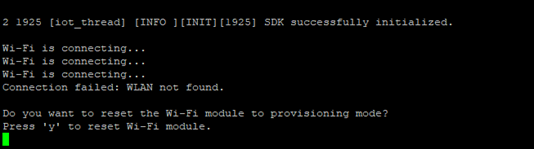
These messages indicate that the connection to the Wi-Fi network shall be configured. Proceed with pressing the appropriate key as indicated.
The board will next host a local WiFi network and a HTTP server to permit the configuration of the Wi-Fi network
Connect your computer or phone/tablet to the board's Wi-Fi network Serial2Wifi.
Use the passphrase: nxp12345
Open an internet browser and browse to http://192.168.10.1 to access the board’s configuration page
Select Provisioning to view the list of available Wi-Fi networks
Select your Wi-Fi network name/SSID, provide the passphrase and press Connect.
We recommend using a hotspot to avoid IT connectivity blockage.Wait for 1 minute, then reset the board using the board's Reset button
After rebooting the board should be connected to the Wi-Fi network.
On the serial debug port, you should see messages related to the board's connection to MQTT: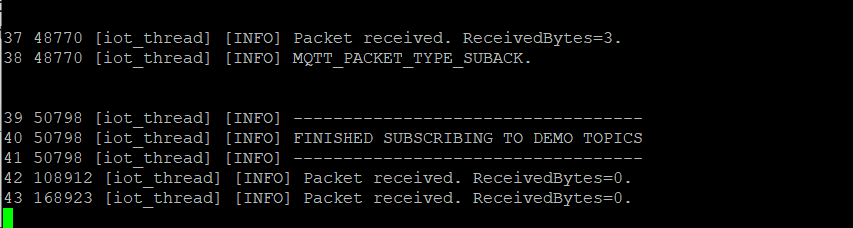
Board Initialization
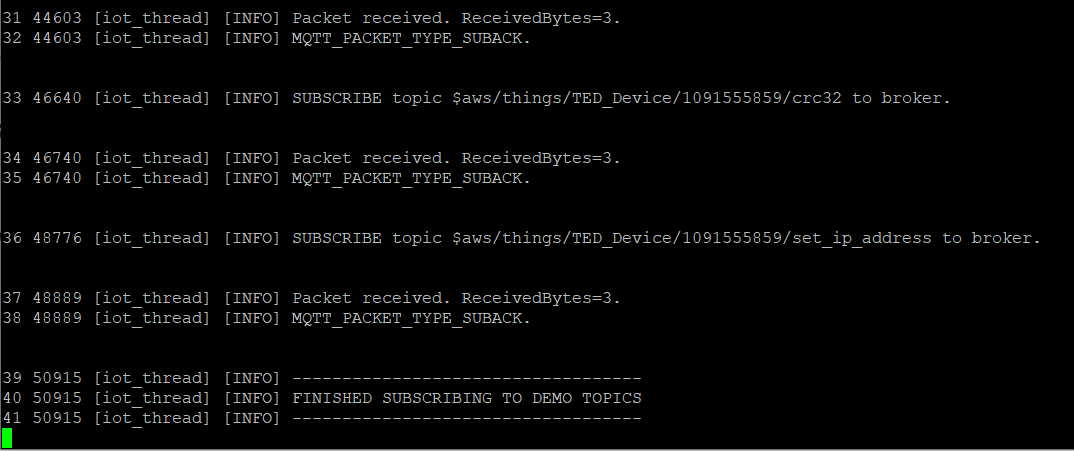
Each time the board (re)boots, it is important to wait for the firmware to complete its initialization and subscribe to all the topics before sending data to the firmware via the exploitation script.
Wait for the FINISHED SUBSCRIBING TO DEMO TOPICS message in the serial debug output:
Identifying the Board Serial Number / Device ID
You need the Board Serial Number / Device ID to use the exploitation script. This is the value that was set during the installation process. The value is also displayed by the firmware on the serial debug output. Look for the following message:

Flashing Firmware to the Board
This section explains how to flash a firmware to the board. You will use these instructions in the next sections.
Make sure the board is connected to the computer using the USB cable.
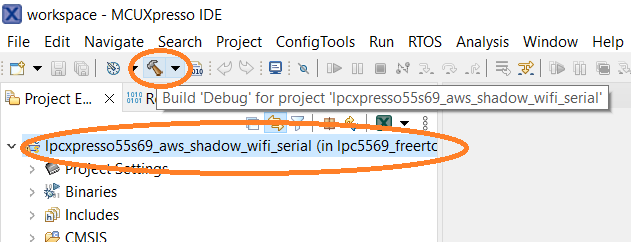
Build the project if not done yet:
- Select the top project element (top element lpcxpresso55s69_aws_shadow_wifi_serial) in the Project Explorer
- Click the build icon on the menu bar (note that the icon may be at a different place in the menu bar):
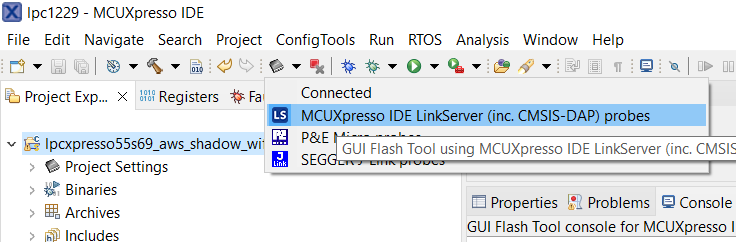
When the build is complete, the GUI Flash tool from MCUXpresso tool bar should become enabled (again make sure that the top project element is selected in the Project Explorer):

You may have to select the MCUXpress flash tool explicitly:
The flash tool may ask to connect to the device: Connect to target: LPC55S69. Click OK to proceed.
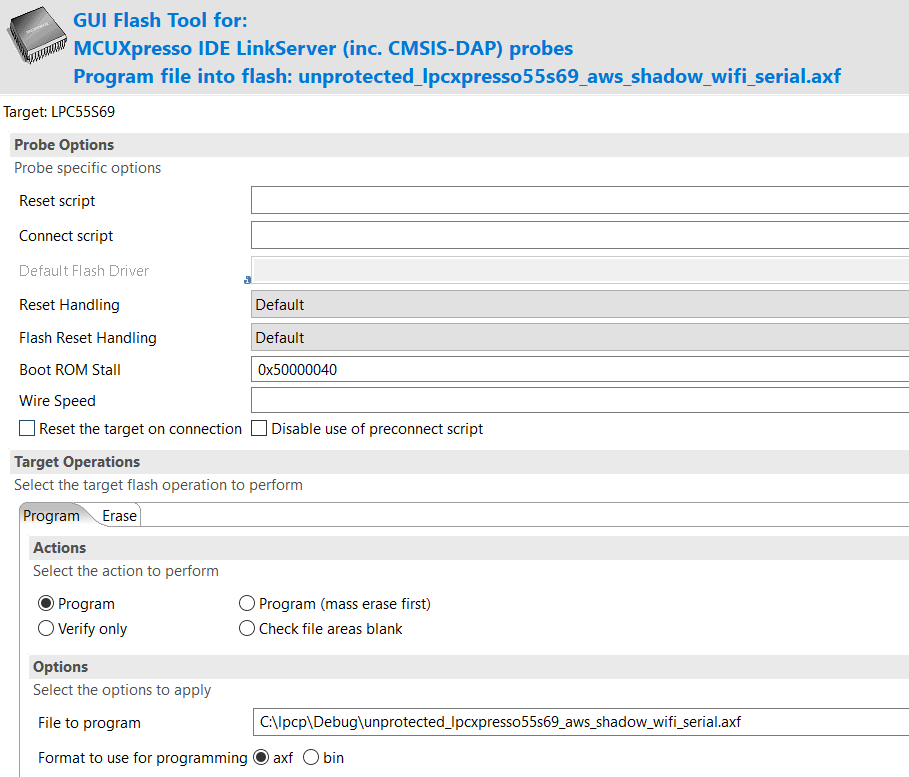
In the GUI flash tool window, select the firmware you want to flash to the board in the File to program field, then click Run.
If requested, select the first device in the SWD Configuration pop up window.For example, flashing the unprotected firmware:
The IDE generates the following firmware after a successful build:
- Unprotected firmware: Debug/unprotected_lpcxpresso55s69_aws_shadow_wifi_serial.axf
- Firmware protected by EIV: Debug/lpcxpresso55s69_aws_shadow_wifi_serial.axf.
You will use these 2 firmware in the next sections.
Accessing the Sternum platform
During the evaluation, you will acccess the Sternum Platform to view security alerts, monitor devices and use its other features. To login on the Sternum Platform:
Navigate to the https://app.sternum.cloud
Log in with the credentials provided by Sternum or with your email/password if you already have an Sternum Platform account.
Verify that the Sternum Platform workspace named like "LPC55S6x Eval Kit" is selected. The workspace name is shown on the bottom in the left menu. You can change to the proper workspace by selecting the corrrect one by cliking
Workspaceson top of that menu.
Uploading firmware symbols to the Sternum Platform
On the Sternum Platform, the security alerts generated by EIV provide detailed information about the prevented exploits, such as corrupted memory addresses and name of the associated functions. The addresses and function names are provided by the symbol information generated during the firmware build.
The symbols have been preloaded on the Sternum Platform for convenience. If you change the firmware, you need to upload the new symbols by following these steps:
Login to the Sternum Platform
Navigate to the Products page and select the LPC55S6x Product
On the firmware Version 1.0.0, click the triple dot menu and select Load symbols.
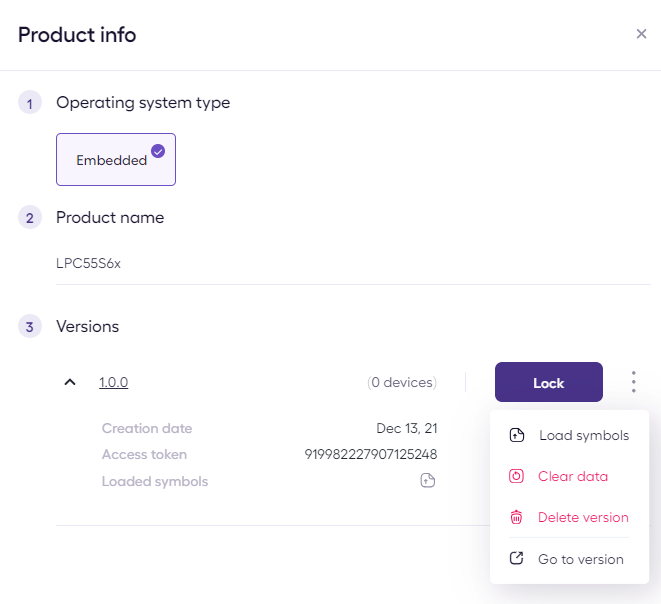
Click Delete symbols if older symbols are present and Load symbols is not on the menu.
Select Upload on the Load symbols popup to load the new firmware's symbols
Navigate to the MCUXpresso project folder and select the lpcxpresso55s69_aws_shadow_wifi_serial.axf firmware file (protected by EIV) present in the debug-EIV folder.
The protected firmware's symbols are then loaded on the Sternum Platform and correct mapping of the various memory addresses to their associated functions will be displayed in EIV security alerts.
Running the Firmware
MCUXpresso IDE allows to generate two separate firmware:
- An unprotected firmware that embeds the vulnerabilities described in the previous section, and
- A firmware that embeds the same vulnerabilities but which is protected by EIV.
You will first flash the device with the unprotected firmware, then run the exploitation script and see successful exploitation of the device.
Then, you will flash the device with the firmware protected by EIV and run the same attacks, see that EIV protects the device against them and also see on the Sternum Platform the security alerts generated by EIV.
The detailed steps to run the two firmware are documented below.
Attack Utility Usage
This section documents the different options and commands supported by the attack utility python script, which will be used in the next sections.
The script attack_utility.py can be found in the Exploits sub-directory of the project (e.g. C:/lpc/Exploits).
usage: attack_utility.py [-h] -d DEVICE_ID -s {stack_overflow,heap_overflow,flow_integrity_violation,use_after_free,remote_update,reboot,performance_test,set_ip_address_error}

options:
  -h, --help            Show this help message and exit
  -d/--device_id DEVICE_ID
                        The ID of the target device ID
  -s/--scenario {stack_overflow,heap_overflow,flow_integrity_violation,use_after_free,remote_update,reboot,performance_test,set_ip_address_error}
                        The scenario to execute for the specified device
| Scenario | scenario Parameter Value (-s parameter value) |
|---|---|
| Run a Stack Overflow attack | stack_overflow |
| Run a Heap Overflow attack | heap_overflow |
| Run a Flow integrity attack | flow_integrity_violation |
| Run a Use After Free attack | use_after_free |
| Run a CRC32 performance test | performance_test |
| Trigger a set of Reboot traces and reboot the board (see Cyber Attack Detection and Investigation) | reboot |
| Trigger a set of Update Start traces (see Cyber Attack Detection and Investigation) | remote_update |
| Trigger a Bad IP Address trace | set_ip_address_error |
PART 1 - Attacking a Vulnerable Firmware
You will first play the role of an attacker and attack the unprotected firmware.
Open a Windows terminal (Command Prompt). Move to the Exploits directory of the project folder, for example:
cd C:\lpc\ExploitsIn MCUXpresso, build the project. The build will generate:
- The unprotected firmware: C:/lpc/Debug/unprotected_lpcxpresso55s69_aws_shadow_wifi_serial.axf, and
- The firmware protected by EIV: C:/lpc/Debug/lpcxpresso55s69_aws_shadow_wifi_serial.axf.
Flash the board with the unprotected firmware unprotected_lpcxpresso55s69_aws_shadow_wifi_serial.axf.
(see the Flashing firmware to the board section above for how to flash instructions).Reboot the board using the RESET button on the board.
The Wi-Fi configuration should have been saved and should be reused by the new firmware. If not, re-configure it per previous section.Wait for the board initialization to complete and display the FINISHED SUBSCRIBING TO DEMO TOPICS message (see above).
Verify that the attack utility script can communicate with the board and that the firmware works as expected:
On the PC, run the exploitation script in the Windows console to reboot the board:Reboot the boardpython3 attack_utility.py -d <board_serial_number> -s rebootThe device shall reboot.
Again, wait for the device to completeky initialize. Wait for the FINISHED SUBSCRIBING TO DEMO TOPICS message (see above).
On the PC, now run a real attack using the exploitation script. You will use the pyhton exploitation script.
For example: python3 attack_utility.py -d 2097775479 -s stack_overflow to run a stack corruption attack.
See the Vulnerabilities section for the exploit details and exploitation script parameters to use.The shellcode that exploits the different vulnerabilities, as designed, will freeze the board. You will see no update from the board in the serial debug console.
You can also test that the board is frozen by sending for example a reboot command via the exploitation script:Attack utility script usagepython3 attack_utility.py -d <board_serial_number> -s rebootThe board will not react, not display the received MQTT command,nor will it reboot.
After each attack, you will need to restart the device via the RESET button.
Note: The script sends a payload that reaches the vulnerable function, exploiting the associated vulnerability, and hijacking the execution flow. The payload contains ARM instructions that run after the execution is hijacked. Specifically, this payload freezes the device, but it could have executed any other logic.
PART 2 - Attacking a Protected Firmware
Now, you will attack the firmware protected with EIV and see that the exploits fail. On the Sternum Platform, you'll also see the security alerts generated by EIV for each prevented exploit.
Before starting, if you have modified the firmware, make sure the latest symbols of the protected firmware have been uploaded to the Sternum Platform. See the above Uploading firmware symbols to the Sternum Platform section.
Flash the board with the protected firmware (lpcxpresso55s69_aws_shadow_wifi_serial.axf).
Repeat the same process as in PART 1:
- Reboot the board, and wait for the board to initialize completely (FINISHED SUBSCRIBING TO DEMO TOPICS message).
- Verify that the board reboots when sending the reboot command using the exploitation script.
- Wait for the board to initialize completely (FINISHED SUBSCRIBING TO DEMO TOPICS message).
Re-run the script as in PART 1. This time, you should see a message from EIV in the debug serial console, for example: Stack corruption security alert was detected at: 24D1B to address: 7F7B1143.
This message indicates that EIV detected and prevented the exploit.
EIV blocks the script's attempt to exploit the vulnerability and by default reboots the device to maintain its integrity. When such an exploitation attempt is detected and blocked, EIV also sends a security alert to the Sternum Platform.
Optionally, a custom callback sternum_port_security_alert() could be used by the developer to implement the specific logic to execute when an attack is detected and/or prevented. This callback is not used in the project.
Login to the Sternum Platform to view the security alert generated by EIV:
- Navigate to Prevented attacks to view the list of security alerts:
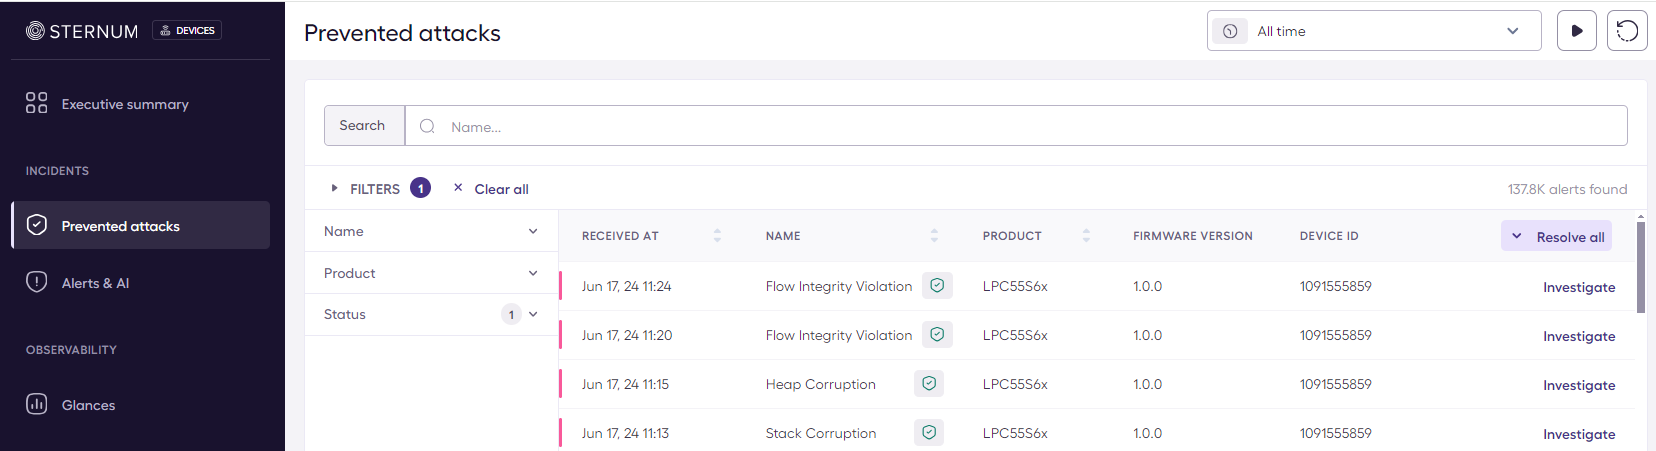
- Click on one of the alert name or its Investigate button to navigate to the Attack Investigation screen that shows all details about that alert.
The next section Vulnerabilities explains the different vulnerabilities implemented in the kit, how to trigger the associated attacks and shows alerts generated by EIV when preventing the exploitation of the associated vulnerabilities.