Embedded SDK Integration
The SDK comes with the full source code to allow porting to most operating systems, including bare metal systems, boards and communication protocols.
The integration has 2 main components:
- Core integration: Integration to the target operating system, for mutexes and time routines.
- Networking integration: Integration of the communication channel for the SDK to send traces to the Sternum Platform, either directly via TCP/IP socket, TLS or HTTPS or indirectly via an intermediate device and application called relay. See section Communication Models for more information.
The terms integration, port and porting are used interchangeably.
SDK Setup
The SDK comprises the following components:
- SDK package - The package contains the source files necessary to compile the SDK and to add traces in the firmware code, as well as examples of integration and API usage.
- SDK Configurator - A graphical editor to add and configure traces. Refer to Setup for instructions.
SDK package
The SDK package is delivered as a compressed archive and contains the following artifacts:
- SDK Core files - Source files that implement the SDK functionality
- SDK integration files - Source files that implement examples of integration to specific target operating systems
- Examples - Source files that provide examples of integration to different operating systems as well as example of API usage.
Installation
Uncompress the SDK package into your development machine so your can browse and copy the appropriate files into your project, as explained next.
Configuration
Your project will need the SDK Core .c and .h files as well as the files required for the integration to your operating system.
How you will organize the various files in your project varies, but the following describes the general configuration.
SDK Core library
The sternum_sdk directory contains the core SDK functionality, including the header files required to add traces in the firmware.
- Copy this directory to your project.
- Add sternum_sdk/include to your include paths
- Add sternum_sdk/src to the sources paths to be compiled
Integration
The ports directory contains examples of integration to specific OS/RTOS systems.
You will need to copy and/or customize the appropriate files to your project. See the Ports implementation guide section.
System-dependent functions
Core integration
The core functions that need to be ported are defined in sternum_sdk/include/sternum_sdk/ports/system_port.h.
| Function | Description |
|---|---|
| sternum_port_initialize_lock_objects() | Initializes synchronization objects. Used to allocate (if needed) and initialize mutexes. |
| sternum_port_deinitialize_lock_objects() | Release all acquired resources and allocated memory for synchronization objects. |
| sternum_port_trace_buffer_mutex_lock() | Locks the trace buffer mutex |
| sternum_port_trace_buffer_mutex_unlock() | Unlocks the trace buffer mutex |
| sternum_port_packets_buffer_mutex_lock() | Locks the packets buffer mutex |
| sternum_port_packets_buffer_mutex_unlock() | Unlocks the packets buffer mutex |
| sternum_port_transmission_mutex_lock() | Locks the transmission mutex |
| sternum_port_transmission_mutex_unlock() | Unlocks the transmission mutex |
| sternum_port_transmission_state_mutex_lock() | Locks the transmission state mutex |
| sternum_port_transmission_state_mutex_unlock() | Unlocks the transmission state mutex |
| sternum_port_get_time() | Return the current time in milliseconds. The SDK supports systems which do not have a real-time clock. For such port, this function should return 0. |
| sternum_log() | Logging function. Optional implementation. If not implemented, the SDK will use printf by default. |
Networking integration
The networking functions that need to be ported are defined in sternum_sdk/include/sternum_sdk/ports/transmission_port.h.
| Function | Description |
|---|---|
| sternum_port_transmit() | Write trace data to the communication channel. To be customized per your communication mechanism and protocol. Note that the SDK does not depend on network-related open/close port functions. Implement these functions separately as needed. |
Integration files
The SDK needs one port, i.e. one set of above files, for your specific operating system and chosen communication method. You can reuse or adapt the files of the existing ports, or create your own implementation.
For each integration, you will need both the system_port.c and transmission_port.c files that contains your implementation of the integration.
A common setup is to copy the port files to sternum_sdk/src directory.
If using one of provide integration example:
- Copy one of the example system_port.c files (in ports/*/) or the template file in ports/new-port/ to this directory
- Copy one of the example transmission_port.c files (in ports/*/*/) or the template file in ports/new-port/ to this directory
You can alternatively create for example a new directory, e.g. sternum_sdk_port for these ports files. The project would look something like:
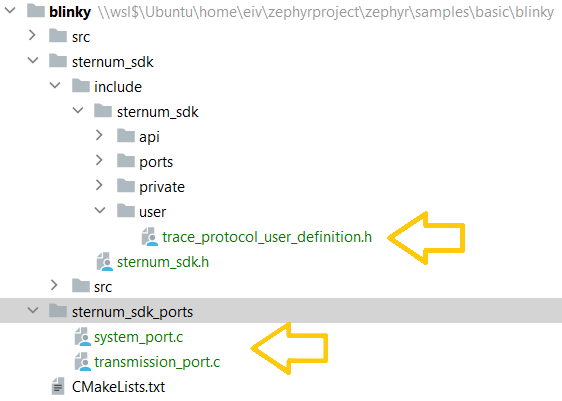
where the orange arrows show the minimal files that your project should have:
- trace_protocol_user_definition.h which contains the trace definitions and which is generated by SDK Configurator.
- system_port.c will contain your implementation of the SDK core port functions.
- transmission_port.c will contain your implementation of the SDK networking port function.
Communication models
The SDK supports both direct and indirect communication to the Sternum Platform.
Direct communication
In direct communication, the firmware has a TCP/IP interface (e.g. over Ethernet, Wi-Fi, Cellular) and the SDK can directly send its data to the Sternum Platform using standard TCP sockets or HTTPS. These 2 protocols are supported off-the-shelf by the Sternum Platform.
Examples of direct communication ports are:
- Linux : in ports/linux/https directories
Indirect communication
For devices that do not provide a TCP/IP interface or cannot support a direct TCP/IP communication to the Sternum Platform, an intermediate device and application - called relay - will be required.
The Relay section of the SDK explains relay applications in more details.
Ports implementation guide
This chapter explains how to implement ports from scratch, breaking down the process for a clearer understanding.
Implementation of system_port.c
The primary goal of system port is to implement the management of locking (e.g. via mutexes) for its critical operations and to get the current time on the target operating system.
Before you begin, check your operating system's guide to find out:
- how to create, lock and unlock mutex,
- how to get the timestamp of system time.
For applications with a single-threaded design, leave the mutexes ports unimplemented (return 0 where needed).
Feel free to skip the synchronization functions description and proceed to the sternum_port_get_time part.
The Sternum SDK tracing module has several critical sections, requiring four lock objects: two for data buffers, one for the part responsible for writing to the network, and one for updating the transmission state and timestamp (if available).
Declare the mutexes as static global variables to ensure accessibility throughout all functions in this file. You have the option to create mutexes either statically or dynamically, depending on your preference. Utilize the OS-provided API for implementation. Our example will demonstrate port implementation on the Zephyr system.
static struct k_sem trace_buffer_mutex;
static struct k_sem packets_buffer_mutex;
static struct k_sem transmission_mutex;
static struct k_sem transmission_state_mutex;
Within the sternum_port_initialize_lock_objects function, ensure to initialize the mutexes as required, while paying careful attention to proper error handling. The function is expected to return 0 upon successful execution and 1 in the event of failure.
int sternum_port_initialize_lock_objects(void) {
    if (k_sem_init(&trace_buffer_mutex, 1, 1) != 0) {
        return 1;
    }

    if (k_sem_init(&packets_buffer_mutex, 1, 1) != 0) {
        return 1;
    }

    if (k_sem_init(&transmission_mutex, 1, 1) != 0) {
        return 1;
    }

    if (k_sem_init(&transmission_state_mutex, 1, 1) != 0) {
        return 1;
    }

    return 0;
}
If resource deallocation or deinitialization is necessary, it should be handled within the sternum_port_deinitialize_lock_objects function. In our example, no specific steps are required. Ensure that any dynamically allocated resources are appropriately deallocated or deinitialized as part of this function.
int sternum_port_deinitialize_lock_objects(void) {
    return 0;
}
The functions sternum_port_X_mutex_lock and sternum_port_X_mutex_unlock are responsible for executing lock and unlock operations on the corresponding mutex object. Be mindful of any additional restrictions related to mutex locking in your operating system, such as restrictions on calling it from interrupts or similar scenarios.
int sternum_port_trace_buffer_mutex_lock(void) {
    return k_sem_take(&trace_buffer_mutex, K_FOREVER);
}

void sternum_port_trace_buffer_mutex_unlock(void) {
    k_sem_give(&trace_buffer_mutex);
}

void sternum_port_packets_buffer_mutex_lock(void) {
    k_sem_take(&packets_buffer_mutex, K_FOREVER);
}

void sternum_port_packets_buffer_mutex_unlock(void) {
    k_sem_give(&packets_buffer_mutex);
}

void sternum_port_transmission_mutex_lock(void) {
    k_sem_take(&transmission_mutex, K_FOREVER);
}

void sternum_port_transmission_mutex_unlock(void) {
    k_sem_give(&transmission_mutex);
}

void sternum_port_transmission_state_mutex_lock(void) {
    k_sem_take(&transmission_state_mutex, K_FOREVER);
}

void sternum_port_transmission_state_mutex_unlock(void) {
    k_sem_give(&transmission_state_mutex);
}
The sternum_port_get_time method is expected to return the time in milliseconds or 0 if the implementation is not feasible. If this method remains unimplemented, the mechanism designed to prevent excessively frequent network writes will be deactivated.
unsigned long int sternum_port_get_time(void) {
    return k_uptime_get();
}
See sternum_sdk_settings_t.inter_transmission_delay_ms description in Using the API section for more details on this feature.
Implementation of transmission_port.c
The SDK is designed to transmit data either directly to the Sternum Platform (if an IP network connection is available on the device) or indirectly via a Relay Application. This section provides guidance on implementing the data transmission process for both cases using the following examples:
- Direct communication to the Sternum Platform using HTTPS
- Indirect communication to the Sternum Platform using Bluetooth to communicate to the Relay application.
HTTPS transmission
Before you start:
- check which SSL/TLS libraries your environment supports
- check the size limitation for a single transmission.
Below is an example implementation of an HTTPS request using OpenSSL. Choose an appropriate SSL/TLS library based on your system configuration. Demonstrated sternum_port_transmit function involves three key operations:
- Opening the connection
- Writing data
- Closing the connection
Remember to update the server parameters to match your Sternum Platform gateway configuration (as provided by Sternum):
#define HOST "example.sternum.cloud"
#define PORT "5001"
#define PATH "/v1/trace"
Opening the connection
Implement the connection establishment using your chosen secure library. The code for this operation may vary based on the operating system and the specific library you've selected.
signed long int sternum_port_transmit(const void *buf, size_t count) {
    SSL_CTX *ctx = NULL;
    SSL *ssl     = NULL;
    BIO *bio     = NULL;
    int ret      = -1;

    // Initialize the SSL library
    SSL_library_init();
    SSL_load_error_strings();
    OpenSSL_add_all_algorithms();

    // Create an SSL context
    ctx = SSL_CTX_new(TLS_client_method());
    if (ctx == NULL) {
        LOG_ERROR("Error creating SSL context\n");
        return -1;
    }

    // Create a BIO (Basic I/O) to connect to the server
    bio = BIO_new_ssl_connect(ctx);

    // Use BIO_set_conn_hostname to set the hostname and port
    if (BIO_set_conn_hostname(bio, HOST ":" PORT) != 1) {
        LOG_ERROR("Error setting connection hostname\n");
        goto cleanup;
    }

    // Create SSL connection
    BIO_get_ssl(bio, &ssl);
    SSL_set_mode(ssl, SSL_MODE_AUTO_RETRY);

    // Connect to the server
    if (BIO_do_connect(bio) <= 0) {
        LOG_ERROR("Error connecting to server\n");
        goto cleanup;
    }
Writing data
Once the connection is up, create the request with the binary data and send it to the Sternum Platform.
HTTPS request format
To ensure proper communication via HTTPS requests, adhere to the following format:
| Request Component | Example |
|---|---|
| Request Method | POST |
| HTTP Version | HTTP/1.1 |
| Request Path | provided by Sternum |
| Host Header | provided by Sternum |
| Content-Type Header | Content-Type: application/octet-stream |
| Content-Length Header | Content-Length: [dynamic value based on the transmission buffer size] |
The example below illustrates the structured format for an HTTPS request:
POST /v1/trace HTTP/1.1
Host: example.sternum.cloud
Content-Type: application/octet-stream
Content-Length: 123\r\n\r\n
[Binary Data]
You can verify the request format by using the following curl command (ensure to fill in the data bytes with trace data):
curl --location 'https://example.sternum.cloud/v1/trace' \
--header 'Content-Type: application/octet-stream' \
--data-raw '[trace data]'
Implementation
Create the HTTP header, send it to the Sternum Platform, then transmit the binary data stored in const void *buf buffer, breaking it down in smaller parts as needed. In this example, we assume that MAX_TRANSMISSION_UNIT_BYTES is the maximum amount of bytes that can be sent in a single operation.
For better network performance and error resilience, it's recommended to break down binary data into smaller pieces. A practical chunk size for transmitting binary data over HTTPS could be, for example, 1024 bytes or less, depending on the specific transmission protocol. This segmentation improves data transfer efficiency and helps handle errors more effectively by allowing for precise retransmissions and minimizing the impact of network delays.
    char request[HTTP_REQUEST_HEAD_BUFFER_SIZE];
    snprintf(request, sizeof(request),
             "POST %s HTTP/1.1\r\nHost: %s\r\nContent-Type: "
             "application/octet-stream\r\nContent-Length: %zu\r\n\r\n",
             PATH, HOST, count);

    // Send HTTP request
    if (BIO_write(bio, request, strlen(request)) <= 0) {
        LOG_ERROR("Error writing to server\n");
        goto cleanup;
    }

    // Send the binary data in chunks of maximum size MAX_TRANSMISSION_UNIT_BYTES
    size_t totalSent = 0;
    while (totalSent < count) {
        size_t chunkSize = (count - totalSent < MAX_TRANSMISSION_UNIT_BYTES)
                               ? (count - totalSent)
                               : MAX_TRANSMISSION_UNIT_BYTES;

        ret = BIO_write(bio, buf + totalSent, chunkSize);

        if (ret <= 0) {
            LOG_ERROR("Error writing to server\n");
            goto cleanup;
        }

        totalSent += ret;
    }
Consider reading and printing the server response for debugging purposes. While unnecessary in a production environment, this step can be beneficial during development. Successfully sent requests should yield a response with HTTP 200 OK status.
    char buffer[MAX_RESPONSE_SIZE];
    int ret_response = BIO_read(bio, buffer, sizeof(buffer));

    if (ret_response < 0) {
        LOG_ERROR("Error reading from server\n");
    } else {
        LOG_INFO("%s", buffer);
    }
Regardless of whether the request was sent successfully or not, it is essential to close the established connection and release all associated resources.
cleanup:
    if (bio != NULL) BIO_free_all(bio);
    if (ctx != NULL) SSL_CTX_free(ctx);
    bio = NULL;
    ctx = NULL;

    return ret;
} // end of sternum_port_transmit
Bluetooth transmission
If your device doesn't allow to connect to the network directly, the indirect transmission via Relay application is needed. This section provides an overview of the essential elements required to transmit traces to the Relay application. We'll use Bluetooth as an example of connection with the Relay application without delving into the implementation specifics, as the it will vary depending on the hardware, operating system and Bluetooth library.
Before you begin:
- consult your hardware and operating system documentation for detailed information regarding Bluetooth implementation
- check the limitation for a BLE payload length.
In BLE 4.0 and 4.1 the maximum payload size is 20 bytes. In our specific scenario, the initial two bytes of the message are utilized to store length information. Consequently, this leaves us with 18 bytes for the actual payload content.
Initiate the Bluetooth connection at the application startup and employ the sternum_port_transmit function to send trace data through the established Bluetooth link. To address size constraints associated with Bluetooth transmission, the following example breaks down the data into smaller chunks.
signed long int sternum_port_transmit(const void *data, size_t count) {
    extern uint32_t sternum_event_handler(void* data, uint16_t len);

    // Set the maximum chunk size according to your Bluetooth requirements
    size_t max_chunk_size = 18;

    size_t num_chunks = (count + max_chunk_size - 1) / max_chunk_size;
    for (size_t i = 0; i < num_chunks; ++i) {
        // Calculate the size of the current chunk
        size_t chunk_size = (i == num_chunks - 1) ? (count % max_chunk_size) : max_chunk_size;
        const void* chunk_data = (const uint8_t*)data + i * max_chunk_size;

        // Call the sternum_event_handler to transmit current chunk
        sternum_event_handler((void*)chunk_data, chunk_size);
    }

    return count;
}
The sternum_event_handler sends the packet over the Bluetooth immediately, or if transmission is not possible, data may be stored in transmission queue. The decision on how handle transmission or caching is entirely at the client's discretion, providing the flexibility for the client to implement it according to their specific preferences or requirements.
#define MAX_PACKET_LEN 20

uint32_t sternum_event_handler(void* data, uint16_t len)
{
    ret_code_t err_code;
    uint8_t packet[MAX_PACKET_LEN] = {0};

    // Store size of packet before the payload
    *(uint16_t*)(&packet[0]) = len;
    memcpy(packet + sizeof(len), data, len);

    // Transmission not possible - store it into transmission_queue
    if (!tx_ready) {
         transmission_queue_write(packet, MAX_PACKET_LEN);
         return len;
    }
    tx_ready = false;

    // Transmit packet
    err_code = ble_sternum_transmit(m_conn_handle, packet, MAX_PACKET_LEN);

    if (err_code != NRF_SUCCESS) {
        // Handle transmission failure - e.g. store it into transmission_queue
        if (err_code == NRF_ERROR_RESOURCES) {
             transmission_queue_write(packet, MAX_PACKET_LEN);
             return len;
        }

        return 0;
    }
    return len;
}
If you need more detailed information or additional examples, please consult the provided resources in sternum_sdk/ports/ directory.